Inspiration
The inspiration for Shores of Sorcery was drawn from several sources. The Earthsea series by Ursula K. Le Guin was the original reason for designing the game. This is a great fantasy series that takes place in an archipelago, where some of the main characters are wizards or sorcerers. At first, the game was more faithful to the series; however, it has strayed over time, and now all that remains is a similar setting. A main feature of the game is a dynamic board. On this board, the outer ring of game tiles is rotated every round. This idea was inspired by a map in one of the Pirates of the Caribbean movies, which had sections that could be rotated.
In conclusion, Earthsea and the map from Pirates of the Caribbean were the two main sources from which ideas were drawn. The rest of the game’s tiles, island shapes, and other elements were then developed to create the complete game.
How the Game Is Made
The game is manufactured by 3D printing all game tiles and pieces. These prints are produced using a multi-filament–capable printer, allowing multiple colors to be used for the islands, sea, and all necessary text on the board. The game box and lid are also 3D printed, but in sub-parts that are assembled to form the completed box and lid. PLA filament is used for all 3D-printed components. All paper components for the game are produced using a standard printer. The cards, skill tracker, and reference sheet are printed on thick paper, while the stickers placed on the board are printed using the same printer with sticker paper.
Rules of the Game
Broad Summary: In Shores of Sorcery, each player is a sorcerer vying for the most influence across the archipelago. On your turn, use your limited actions to move, gain skill points, and sway the island’s inhabitants. After every player has gone, the outer ring of the board rotates by one tile. The game ends when the board completes a full rotation back to its starting position. The player with the most points after nine turns is the victor.
Box Diagram:
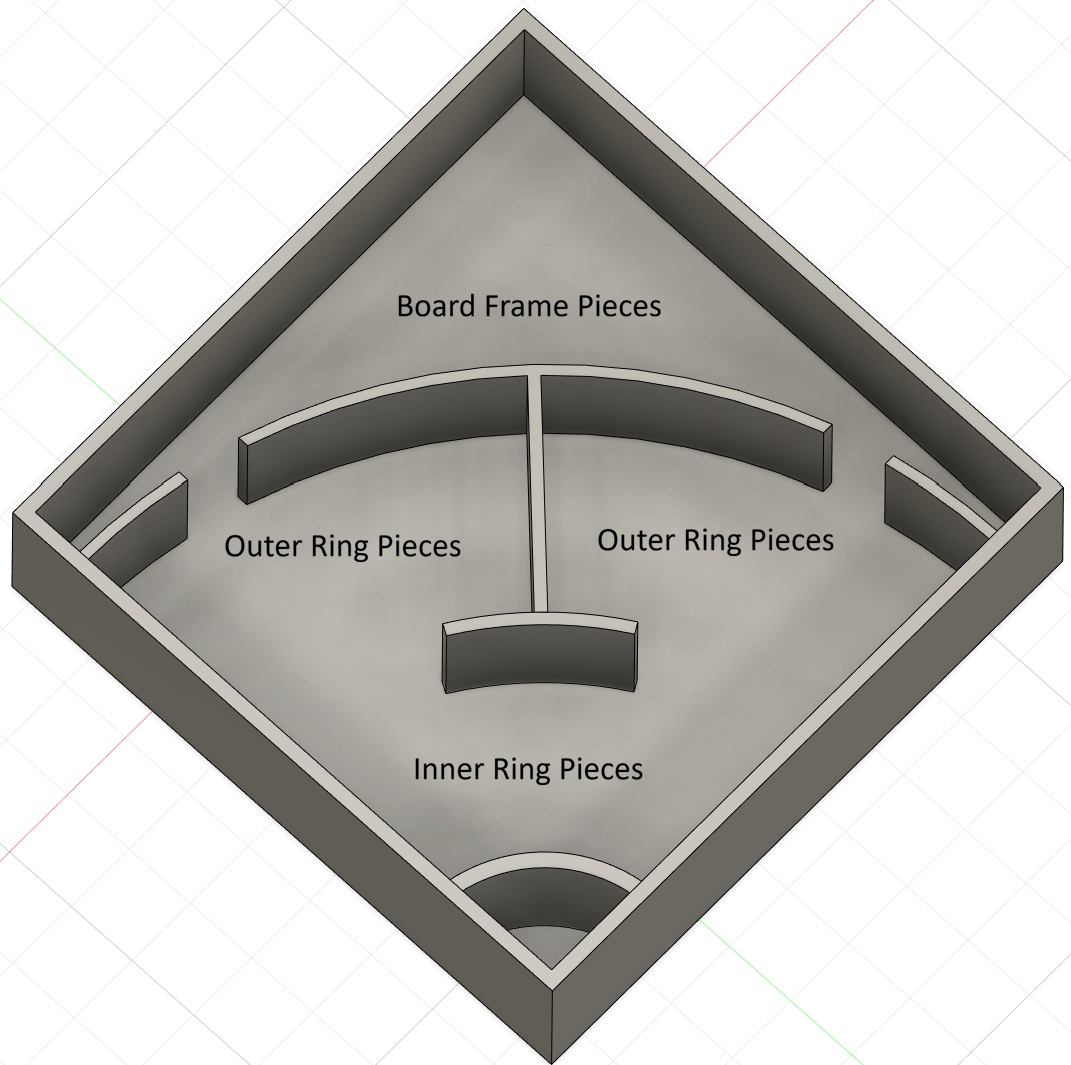
Putting the Board together: First, place the circular center game tile (Tile 1) at the desired center of the board. Next, place the inner ring tiles (Tiles 2–7) around the center tile so that they are flush against one another, forming a larger circle. Then, place the outer ring tiles (Tiles 8–16) around the inner ring tiles. Finally, frame the board using the four frame pieces. Leave a small gap at one connection point to allow the outer ring to spin freely later. Also, align the seams of two frame pieces with the seams of both the outer ring and inner ring tiles, creating a single continuous seam from the frame to the center tile, use the arrows on the board frame and tile 16. This alignment helps ensure consistent and smooth board rotation.
Starting the Game: After setting up the board, randomly distribute the Job tokens, placing 1 Job token on each game tile. There are 2 Job tokens for each Sorcery skill and 6 empty Job tokens. Empty Job tokens are marked with 2 Xs, while all other Job tokens indicate their associated skill using the first several letters of the skill name. Collect all Job tokens, and randomly place one Job token on each game tile. Each player receives a Player Card and places one black cube on Level 1 of each skill type. Each player then increases their skills a total of 10 times, in any combination they choose. For example, a player may raise all skill types to Level 3, or raise only two skill types to Level 6. Any combination is allowed, but the total number of increases may not exceed 10. All players receive two Gold. Place each player’s piece on Tile 1 (the center tile). If you are a beginner and want to make the game a little simpler you can choose to start with a boat as well. Each player rolls the die. The player with the highest roll takes the first turn. If there is a tie, only the tied players reroll until a single player is selected.
Game tiles:
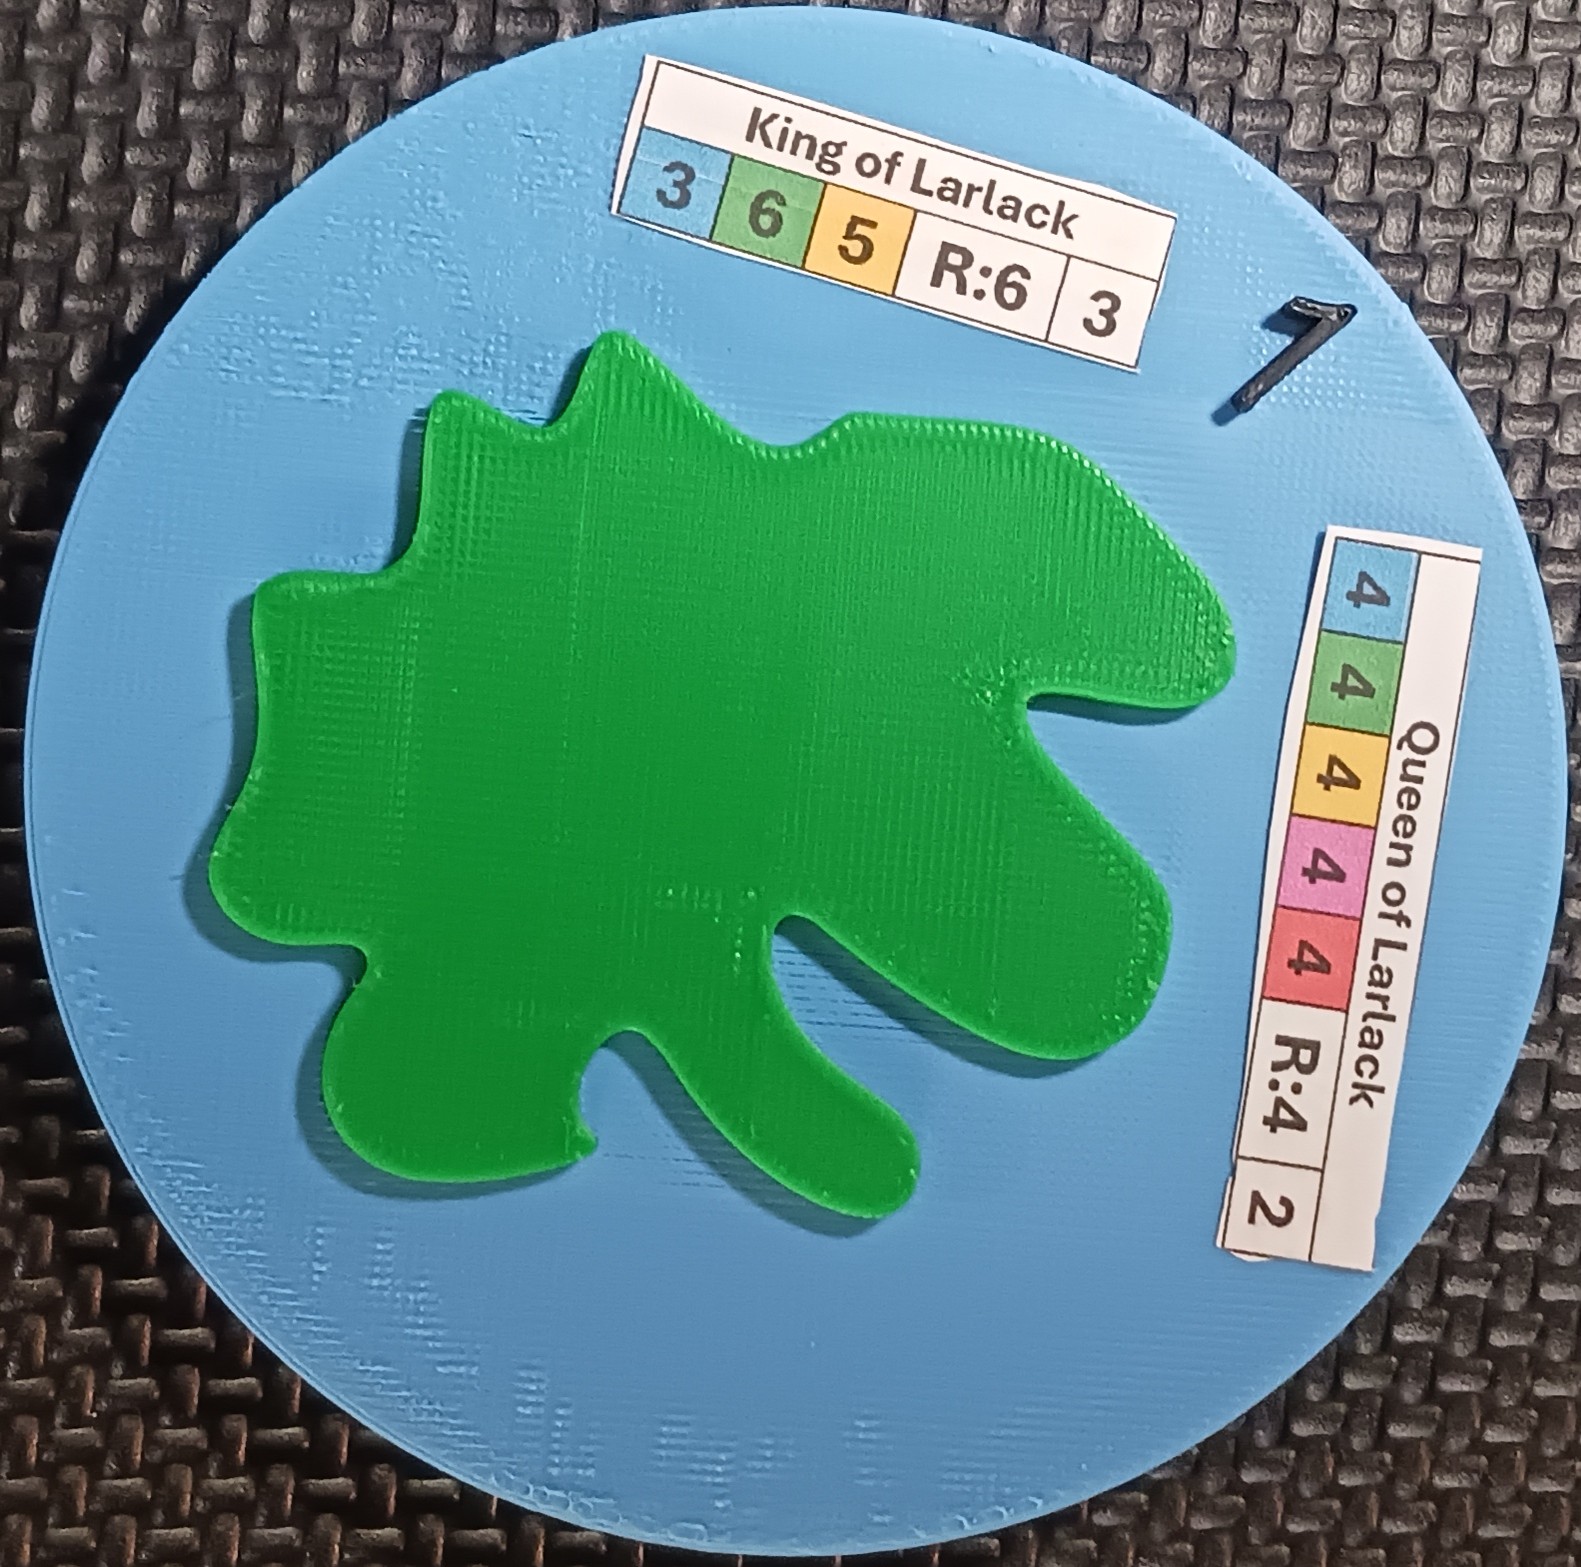 A game tile contains several important pieces of information that players should pay attention to.
The Tile ID is the black number on the game tile.
Each tile has two cards associated with it. These cards are indicated by the stickers placed on the tile. In the example shown in the picture on the previous page, the game tile has Tile ID 1, and the two associated cards are:
A game tile contains several important pieces of information that players should pay attention to.
The Tile ID is the black number on the game tile.
Each tile has two cards associated with it. These cards are indicated by the stickers placed on the tile. In the example shown in the picture on the previous page, the game tile has Tile ID 1, and the two associated cards are:
King of Larlack
3 6 5 R:6 3
Queen of Larlack
4 4 4 4 4 R:4 2The card title is displayed at the top of the sticker. The cost to influence the card is shown by the colored numbers on the sticker. Each color corresponds to a specific skill type. For example, the King of Larlack requires at least 3 Healing, 6 Shape Shifting, and 5 Elemental before an influence attempt may be made. The required die roll to gain the card after an influence attempt has been initiated is indicated by the number following “R.” In this example, the required roll is 6. The final number on the sticker represents the number of points a player gains for possessing the card.
Cards Overview:
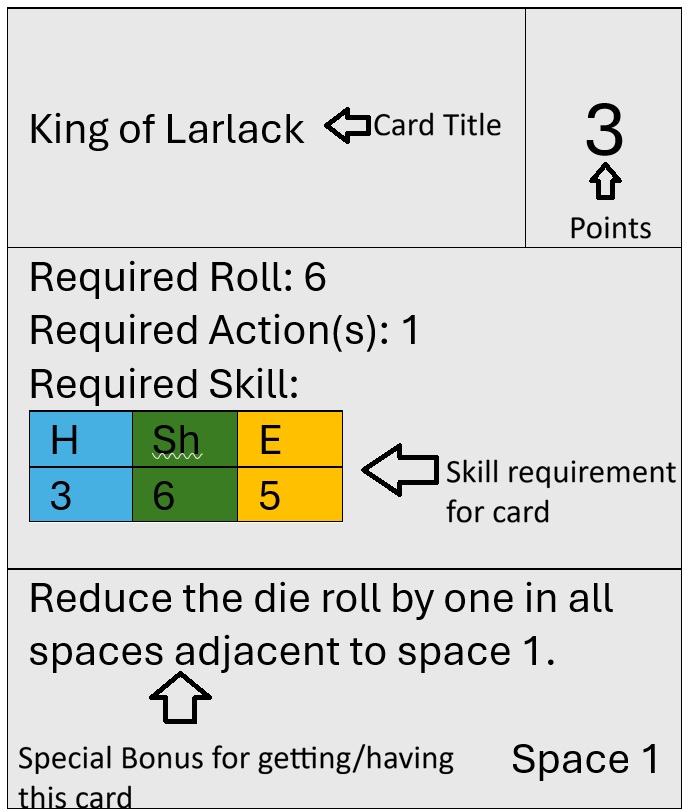 Each card includes the following information: a title, point value, required roll, required actions, required skills, and a special bonus gained by obtaining or possessing the card. Some special bonuses include power boosts. These bonuses remain active only while the player possesses the card. Each card also lists the tile ID it is associated with. Players may only attempt cards that correspond to the space they are currently on.
How to Attempt a card:
Before attempting to gain a card, a player must meet the required skill levels. Skill requirements may be satisfied using the player’s base skills, bonuses granted by other cards, or by spending actions to temporarily increase skills until the end of the turn.
Attempting a card requires actions, so a player must have at least the card’s required action cost available before making the attempt. A player may attempt the same card more than once per turn.
After meeting the skill requirements and spending the required actions, the player may choose to increase their upcoming die roll by spending additional actions, at a cost of one action per +1 to the roll.
The player then rolls the die. If the result equals or exceeds the required roll, the player gains the card.
Each card includes the following information: a title, point value, required roll, required actions, required skills, and a special bonus gained by obtaining or possessing the card. Some special bonuses include power boosts. These bonuses remain active only while the player possesses the card. Each card also lists the tile ID it is associated with. Players may only attempt cards that correspond to the space they are currently on.
How to Attempt a card:
Before attempting to gain a card, a player must meet the required skill levels. Skill requirements may be satisfied using the player’s base skills, bonuses granted by other cards, or by spending actions to temporarily increase skills until the end of the turn.
Attempting a card requires actions, so a player must have at least the card’s required action cost available before making the attempt. A player may attempt the same card more than once per turn.
After meeting the skill requirements and spending the required actions, the player may choose to increase their upcoming die roll by spending additional actions, at a cost of one action per +1 to the roll.
The player then rolls the die. If the result equals or exceeds the required roll, the player gains the card.
Player Card Overview:
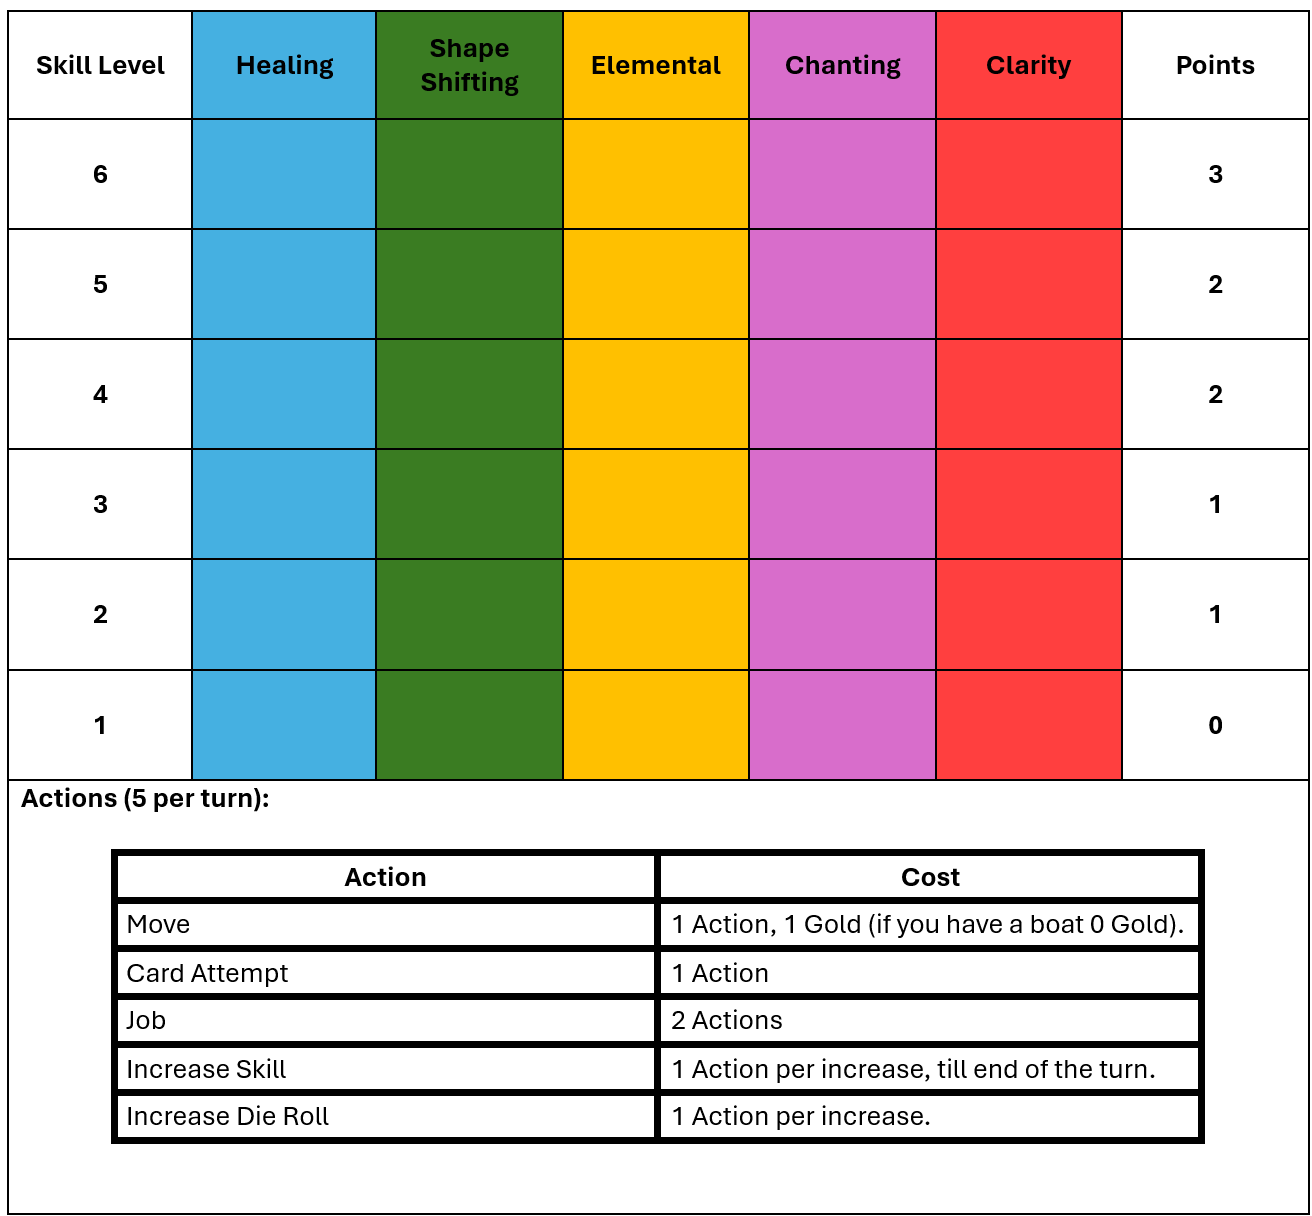 Each player has a Player Card used to track their levels in the five Sorcery skills. The Player Card also shows how many points each skill level is worth at the end of the game.
In addition, the Player Card includes an Action Table that lists the actions a player may take and the action cost of each action.
Each player has a Player Card used to track their levels in the five Sorcery skills. The Player Card also shows how many points each skill level is worth at the end of the game.
In addition, the Player Card includes an Action Table that lists the actions a player may take and the action cost of each action.
Turn Sequence: A turn consists of five actions. These actions include: Moving to an adjacent tile, this costs 1 action, if a player does not own a boat this also costs one gold. This can be done multiple times. A player can exchange 5 gold for a boat at any time on their turn, they receive a boat piece. Jobs cost 2 actions. A job will give the player one gold and increase skill in the type indicated by the job token on the tile they are on if the tile has an empty job token ie the (XX) then the player does not increase there skill but does still gain the gold. Increasing Skill costs 1 action. By doing this a player temporarily increases a skill by one level until the end of the turn. This can be done multiple times. Card Attempts cost 1 action; A player can attempt a card from the game tile they are on, if they meet the skill requirements. This can be done multiple times. Increase Die Roll costs 1 action. After attempting a card a player can choose to use more actions to increase there next die roll to increase their chances of getting the required roll. This can be done multiple times. Sample turns: Move(1), Move(1), Job(2), Attempt Card(1). The total cost of this turn is 5. Or Increase Skill(1), Attempt Card(1), Increase Die Roll(1), Increase Die Roll(1), Increase Die Roll(1). The cost of this turn is 5. This is a good example of choosing to increase the die roll multiple times to increase the chances of getting a card. Any combination of actions can be used if the total does not exceed 5.
Round Sequence: A round is complete when every player has taken a turn. After each round, the outer ring of the board is rotated by one tile. To rotate the outer ring, place your thumb on the board frame and your index finger on the inner ring, then use your other hand to turn the outer ring by one tile. Make sure the seam between two outer ring pieces aligns with the seam of the board frame. Once the outer ring is properly aligned, the next round begins.
Optional Adjustment for Beginners: If you are just learning the game and want to ease into it try this adjustment. Each player starts with a boat.
End of the Game Counting Points: The game ends after nine rounds, and the player with the most points is the winner. Players earn points from cards, skill levels, and gold:
• Cards: The point value is shown in the upper-right corner of each card.
• Skill Levels: Points are indicated on the Player Card in the rightmost column. Power boosts from cards do not apply when calculating skill level points.
• Gold: Players earn 1 point for every 3 gold they have.
If two or more players have the same total points, they tie.
About the Designer
The game design and manufacturing techniques are all created by Isaac Wetherbee. The game design was all completed as Isaacs high school senior project. Isaac studied aerospace engineering at Embry-Riddle. This is where he discovered the awesome power of 3D printing, and realized all game tiles and pieces for Shores of Sorcery could be 3D printed.
Discussion Board
Community discussions will be available here in a future update.
Order Form
Order Shores of Sorcery
Server Status
Server time: 2026-07-29 18:30:48